
A custom LED profile is only as good as the three decisions buyers usually leave to the supplier: the diffuser, the mounting interface and the thermal path. This guide shows what to specify for each, and how those choices change cost, light quality and lead time.
Most LED profile projects do not fail at the extruder. They fail at the drawing stage, where three decisions get left to the supplier: the diffuser, the mounting interface and the thermal path. Each is cheap to fix on paper and expensive to fix after the die is cut.
This guide is for buyers and product engineers specifying a custom LED profile — not a catalog channel. It covers what to decide, what goes on the drawing, and where the trade-offs sit.
Start With the Installation, Not the Profile
Answer four questions before choosing a shape:
- LED load: watts per meter, not "bright enough". A 14.4 W/m strip and a 4.8 W/m strip need very different aluminum.
- Mounting: surface, recessed, suspended or trimless. Each changes the flange, the cut-out and the clip.
- Light appearance: a dot-free line, a soft wash or a defined beam are three different diffusers.
- Environment: indoor dry, bathroom, coastal or outdoor. This drives alloy, anodizing thickness and sealing.
Get these on one page and the profile almost designs itself. Skip them and you will review five drawings that all miss the point.
The Diffuser Decides the Light
The aluminum is the structure; the diffuser is the product. Buyers often approve the extrusion and then choose a cover from a photo — which is where diffuser dotting, glare and color shift come from.
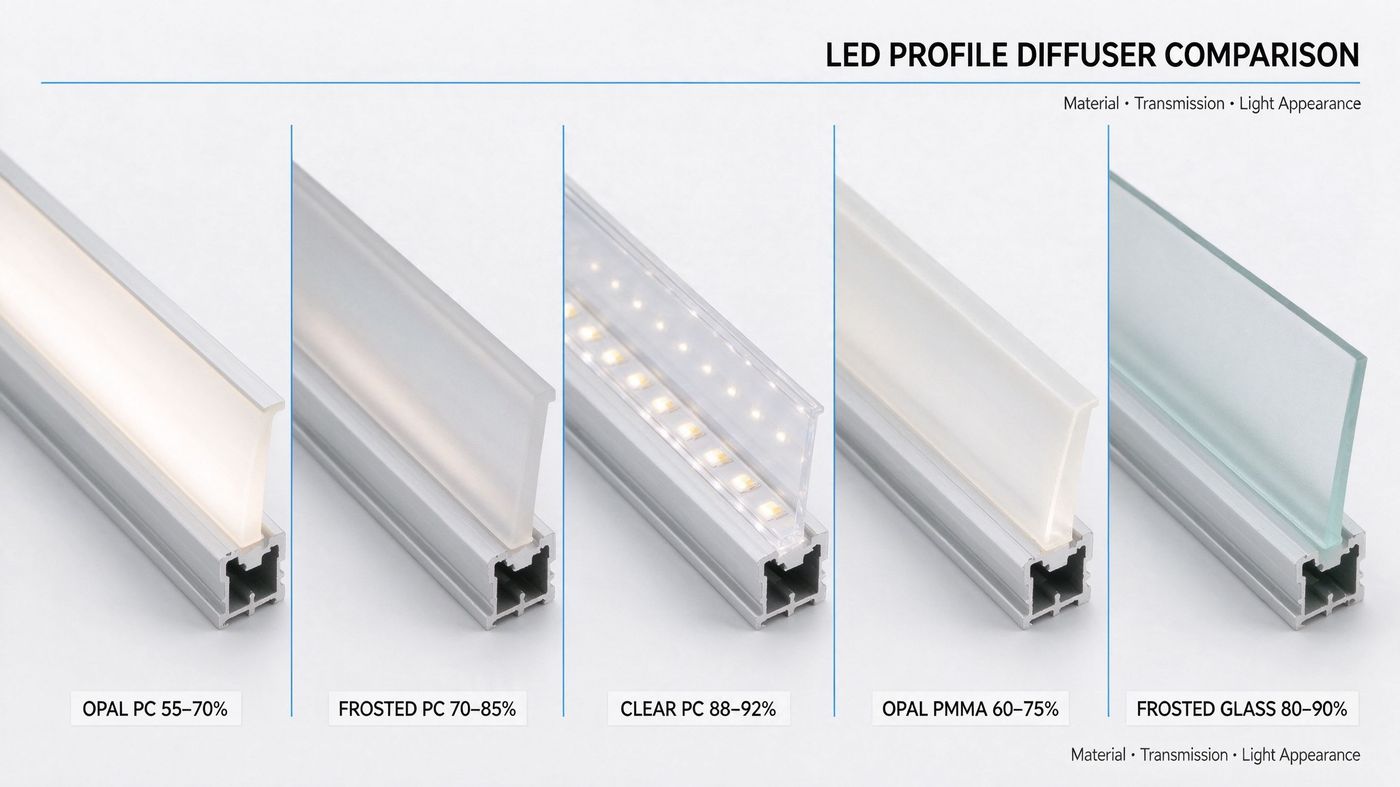
Five diffuser options for the same extrusion: material and thickness decide transmission, and transmission is not the same as quality of light.
| Diffuser | Transmission | Effect | Best for | Watch out for |
|---|---|---|---|---|
| Opal polycarbonate | 55–70% | Even, dot-free line | Office, retail, residential | Absorbs the most light |
| Frosted polycarbonate | 70–85% | Diffusion with some direction | General linear lighting | Dotting if too thin |
| Clear polycarbonate | 88–92% | Maximum output, visible diodes | High-bay, display | Glare in sight lines |
| Opal PMMA | 60–75% | Best optical clarity | Premium interiors | Brittle at clips and caps |
| Frosted glass | 80–90% | Scratch-proof, premium | Architectural, hospitality | Weight, cost, fragile |
Two rules. Thickness matters as much as material: 1.0 mm opal PC at 120 LEDs/m still shows dots; 1.5–2.0 mm hides them. And transmission is not efficiency — a diffuser that loses 40% of the light can still win if it removes glare and lets you use fewer, better-driven fixtures.
For damp or outdoor locations, specify UV-stabilised PC, not standard PMMA. Acrylic yellows and crazes under UV and moisture, and a yellowed line becomes a warranty claim.
Fit and Tolerances
A profile that looks right on the drawing can still rattle, leak light at a joint or refuse the diffuser after anodizing.
- Diffuser slot: specify the fit, not just the slot width — the cover should snap in by hand and stay put.
- Wall thickness: 1.2–1.5 mm is normal indoors; 1.5–2.0 mm for spans over about 1.5 m or heavy diffusers.
- Straightness: ask for straightness per meter, not "straight". Long runs show a 2 mm bow.
- End caps: state cable entry size and whether screwed or push-fit — the most common late change.
- Deburring: saw burrs cut installers and tear diffusers. Put it on the drawing.
Mounting: Four Interfaces, Four Drawings
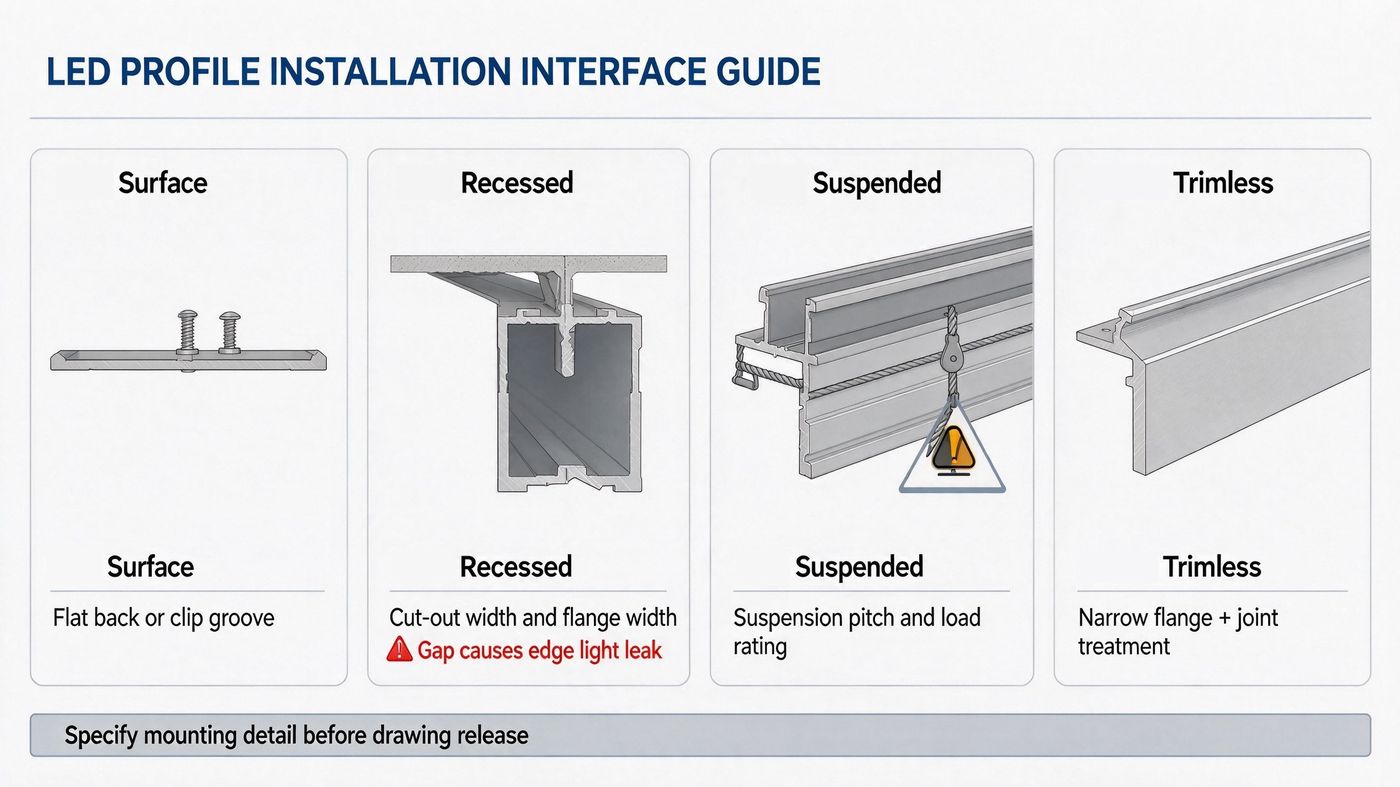
Four mounting interfaces, four different drawings. The recessed detail is the one that leaks light: a 2 mm gap between cut-out and flange is visible in every finished ceiling.
| Mounting | Profile needs | You must specify |
|---|---|---|
| Surface | Flat back, screw channel or clip groove | Screw pitch, clip spacing, cable exit |
| Recessed | Flanges covering the cut-out edge | Recessed cut-out width and depth, flange width, ceiling detail |
| Suspended | Top groove for cable or rod | Suspension pitch, load per meter, anchor type |
| Trimless | Narrow flange, keyed surface for filler | Flange thickness, joint treatment, service access |
The recessed cut-out is where projects go wrong. If the recessed cut-out in the ceiling is 2 mm wider than the flange, light leaks around the edge and the flush detail disappears. Send the ceiling detail with the profile drawing and ask the supplier to confirm the flange against it.
The Thermal Path
An LED strip converts only part of its input power into light; the rest becomes heat, which must leave through the aluminum or sit in the air pocket behind the strip. LED channel heat dissipation comes down to four factors:
- Watts per meter — the biggest driver. Double the load, roughly double the heat.
- Cross-section and surface area — more metal near the board spreads heat; more exposed surface releases it.
- Alloy — 6063-T5 extrusion is the standard for LED profiles: good extrudability, conductivity around 200 W/m·K, clean anodized finish. 6061 is for profiles carrying mechanical load; 6005 sits between them.
- Interfaces — thermal tape or paste between strip and aluminum matters more than most buyers expect. A poorly bonded strip runs hot even on a good profile.
A rough check for passive interior lines: allow about 50–100 cm² of exposed aluminum per watt, then verify by test. A 2 m section of 35 mm profile at 14.4 W/m carries roughly 29 W and needs a real measurement — this is the range where cheap channels start to discolour diffusers.
Two points buyers miss. Anodizing is not insulation: a 10–15 µm layer has negligible thermal effect. Powder coating is different: a 60–80 µm polyester film adds resistance, so coated profiles should be slightly derated, and coating must never sit between board and aluminum.
Alloy and Finish by Environment
- Indoor dry: 6063-T5 extrusion, anodized 10–15 µm, natural, black or white.
- Bathroom, kitchen, coastal: anodized 15–20 µm, sealed; 6061 where fixings take load.
- Outdoor: 6063 or 6005, anodized 20–25 µm or powder coated with proper pre-treatment, plus IP-rated sealing.
- Visible black lines: black anodizing shows fingerprints; matte black powder coating hides marks but costs more and adds the resistance above.
What to Put on the Spec Sheet
- Profile width, height and max circumscribed circle — up to 320 mm (extrusion limit of our current press); wider sections need another approach.
- Alloy and temper, wall thickness, straightness per meter.
- Diffuser material, thickness, transmission target, UV rating.
- Mounting type, cut-out dimensions, clip spacing.
- LED load in W/m, ambient temperature, LED channel heat dissipation target.
- Finish type and thickness, color reference.
- Cut lengths, end caps, cable entry, packing.
- Sample quantity and deadline.
Prefer to see the profiles first? Here is a 36-second clip of LED aluminum profiles from our Foshan line.
Prototype Before the Die
For a new shape, a machined or small-lot sample is cheaper than a wrong die. Run the real strip at full load for 72 hours, measure aluminum temperature near the board and at the diffuser, and check diffuser dotting at the intended viewing distance. If it yellows or overheats, change the section before 3,000 meters are on the floor.
At SYHARVEST we extrude, anodize, powder coat and machine in-house in Foshan, so a change to wall thickness, slot fit or finish does not travel between three suppliers. Extrusion-only samples typically take 5–7 working days, profiles with surface treatment about 12 working days, and machined or assembled sets 15–18 working days.
Send your drawing, LED load and mounting detail — we will reply with a profile proposal and a thermal check, usually within 24 hours.
Get a custom LED profile quote: send your drawing to our engineering team.
Interested in Our Products?
Contact us today for a professional quotation tailored to your requirements.
Get a Free Quote